Flat Bottom Bag - Knifty Knitter
UPDATED PATTERN COMPLETED!!! I've made another bag and checked the numbers... there were a few things I needed to change. Thanks Trudy for bringing it to my attention! ~Crystal I've created this pattern for a little bag - it's made with the blue Knifty Knitter loom.
This one is made with Lamb's Pride Bulky which is 100% wool- one strand throughout. (Using different yarn does effect the number of stitches needed which might require some pattern tweeking!) I plan to felt it- I'll post pics when it's done.
1. Wrap 10 pegs with the e-wrap method. Knit back and forth on the 10 pegs for 8 rows (*please note that when I do a flat panel on the loom, I don't double wrap the end peg twice- in other words, I skip the first stitch on each row -this means that you will only wrap 9 pegs on each row but use 10 pegs total. This does make a difference- less stitches on the sides which enables you to wrap a lesser amount of side loops without leaving any gaps on the bottom.)
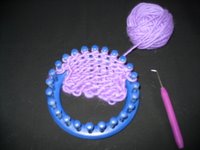 2. Now stretch the stitches across the loom and attach them to the opposite side of the loom. I was easily able to put 8 stitches on the opposite side ... this leaves 3 open pegs on either side.
UPDATE: Bethalice has a great tip here about how to keep track of your stitches to stretch them across the loom! She modified this pattern to make a water bottle holder! Check it out!
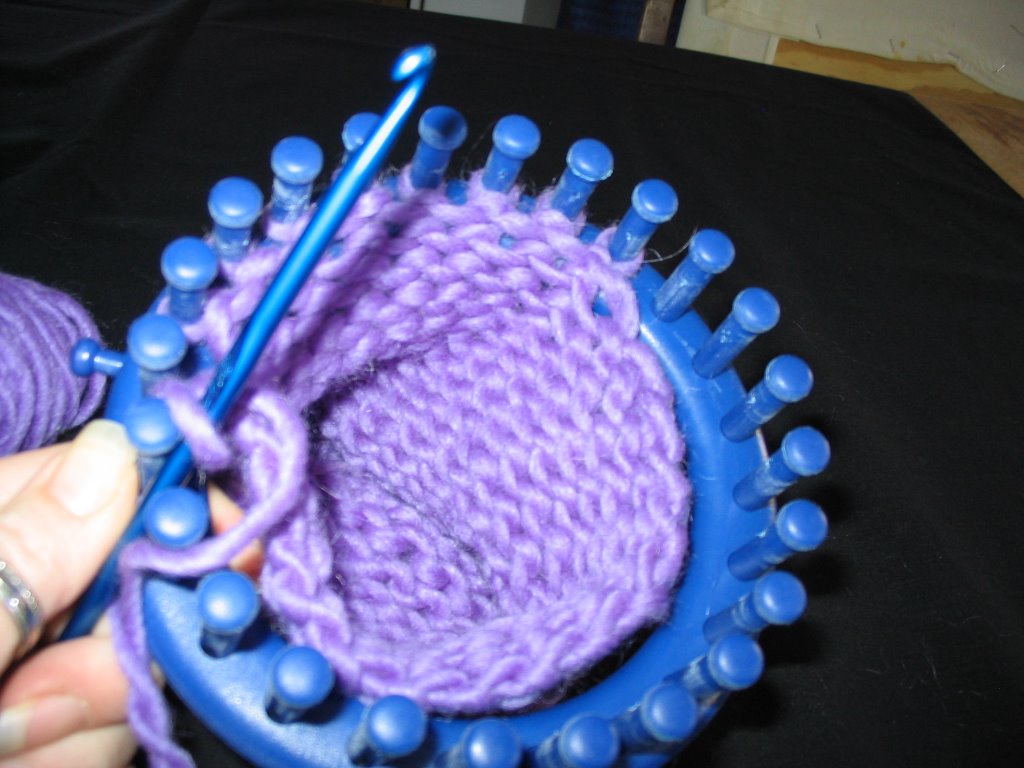
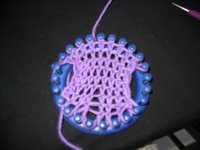 3. Pick up stitches from the side panels of the knitted piece and put them on the pegs. Like this...
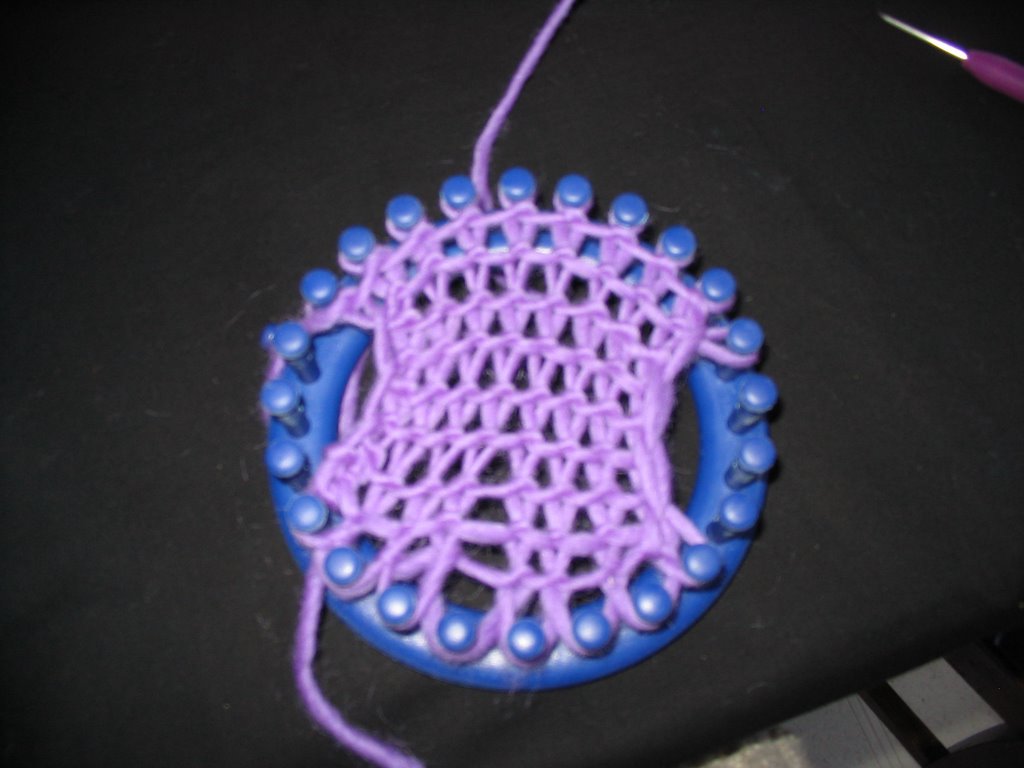
 4. Now e-wrap completely around the loom and knit off. Continue knitting around the loom until the bag is as long as you would like it to be. As you knit along you will see the base of the bag develop into a more boxy shape.

5. When the bag is as long as you would like it to be, wrap the first 11 pegs and knit off. Then, bind off 12 stitches. I used the crochet method. (Remove the first loop with a crochet hook, do 1 crochet chain stitch through this loop. Then, lift the next stitch and pull it through the loop that's on the hook. Do another crochet chain and pick up another stitch, pull loop through the loop. Continue until 12 stitches are removed.)
6. The last crocheted loop is then put on the last peg on a round - this starts the purse flap. (If you start with the peg to the left of the side hook of your loom, this means you will put this loop on the peg to the right of the side hook). It should look like the right picture below.
(NOTE: The flap starts 1 stitch before the pegs that you started with at the beginning--- and ends 1 stitch after -- you had 10 stitches at the very beginning and now you are using 12 pegs)

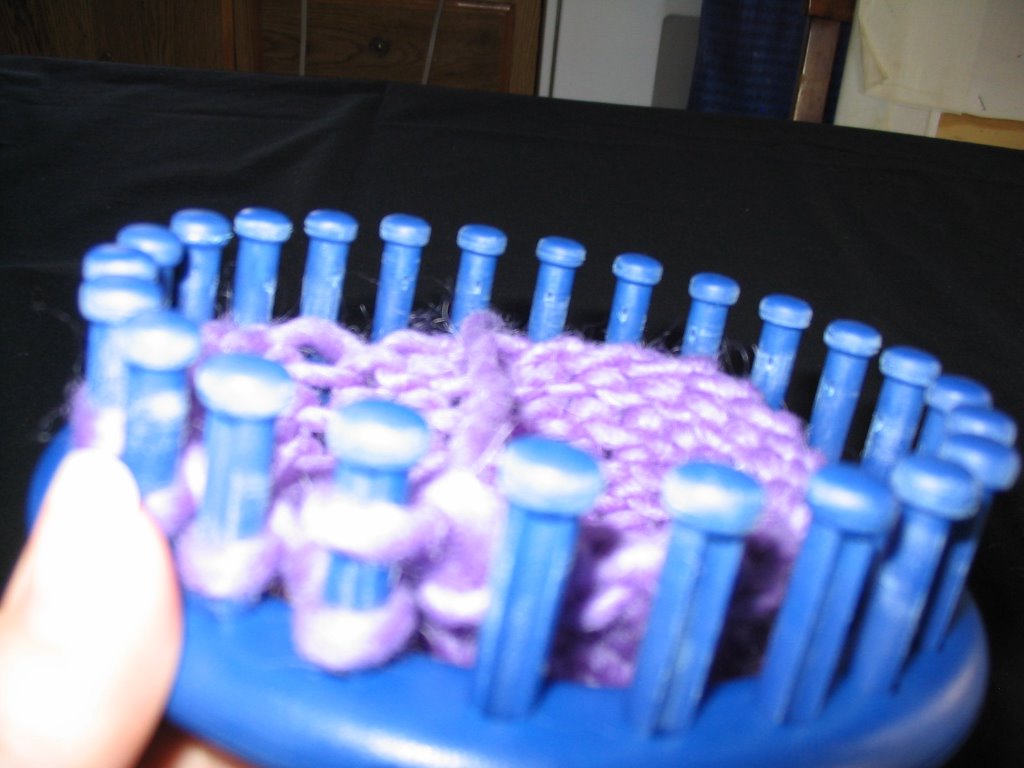
 7. E-wrap the remaining 12 pegs and knit off. Knit 4 rows on the same 12 pegs.
8. Decrease by moving the last stich of the 4th row onto the peg next to it and wrap the 5th row. Knit off. Decrease the next row the same way. Knit 2 rows without decreasing. Decrease the next two rows as before. Knit 2 rows without decreasing. Continue in this manner until you are down to just 5 stitches.
9. Bind off with crochet method as above. With the last single stitch on the crochet hook crochet a chain (I made mine 8 single stitches) Cut the yarn about 5" long and put it through the last chain stitch to end the chain. Then, attach chain to other side of bound off top as in the picture (below right). This creates the loop for the button. Weave in the ends.

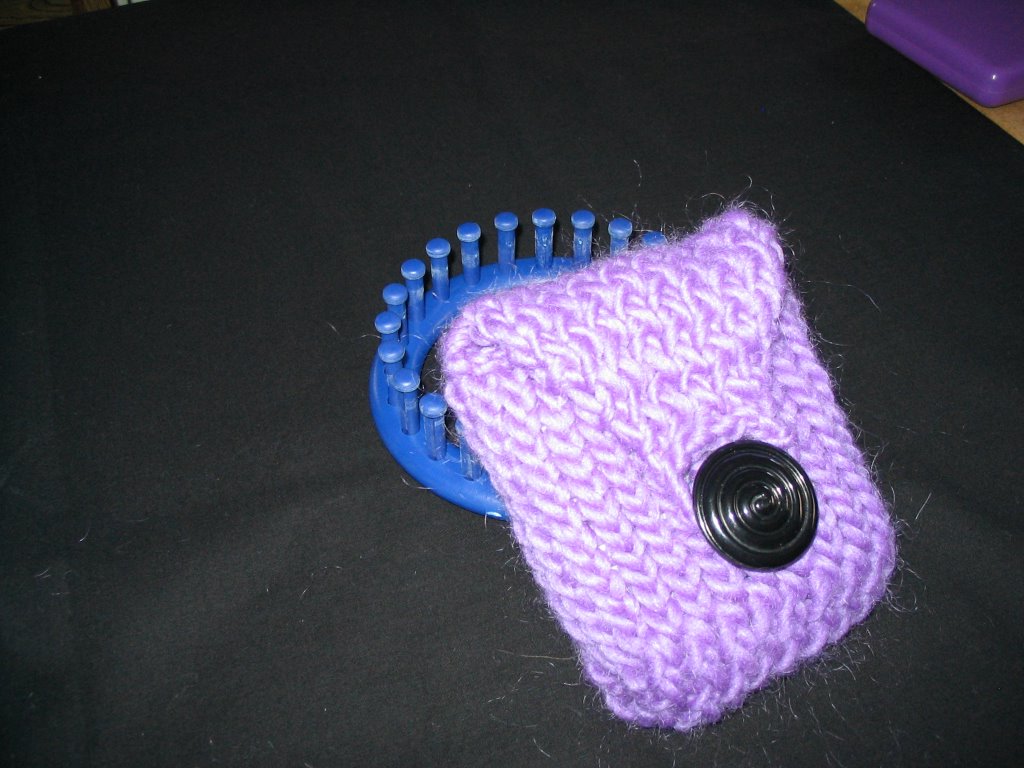
 Now it's done! YAY! Felt if you would like. Before felting and as shown in picture, the bag is about 3 1/2" wide, with a 2" base, and mine is 4 1/2" high. This bag is a good size for my palm pilot. After felting, hopefully it will be the right size for my cell phone!

**I'm a little protective about my patterns so please don't claim it as your own. You are welcome to use it to make some for yourself and your friends... but please don't claim my words or pictures as your own!**
 I've created this pattern for a little bag - it's made with the blue Knifty Knitter loom.
This one is made with Lamb's Pride Bulky which is 100% wool- one strand throughout. (Using different yarn does effect the number of stitches needed which might require some pattern tweeking!) I plan to felt it- I'll post pics when it's done.
1. Wrap 10 pegs with the e-wrap method. Knit back and forth on the 10 pegs for 8 rows (*please note that when I do a flat panel on the loom, I don't double wrap the end peg twice- in other words, I skip the first stitch on each row -this means that you will only wrap 9 pegs on each row but use 10 pegs total. This does make a difference- less stitches on the sides which enables you to wrap a lesser amount of side loops without leaving any gaps on the bottom.)
 2. Now stretch the stitches across the loom and attach them to the opposite side of the loom. I was easily able to put 8 stitches on the opposite side ... this leaves 3 open pegs on either side.
UPDATE: Bethalice has a great tip here about how to keep track of your stitches to stretch them across the loom! She modified this pattern to make a water bottle holder! Check it out!
 3. Pick up stitches from the side panels of the knitted piece and put them on the pegs. Like this...
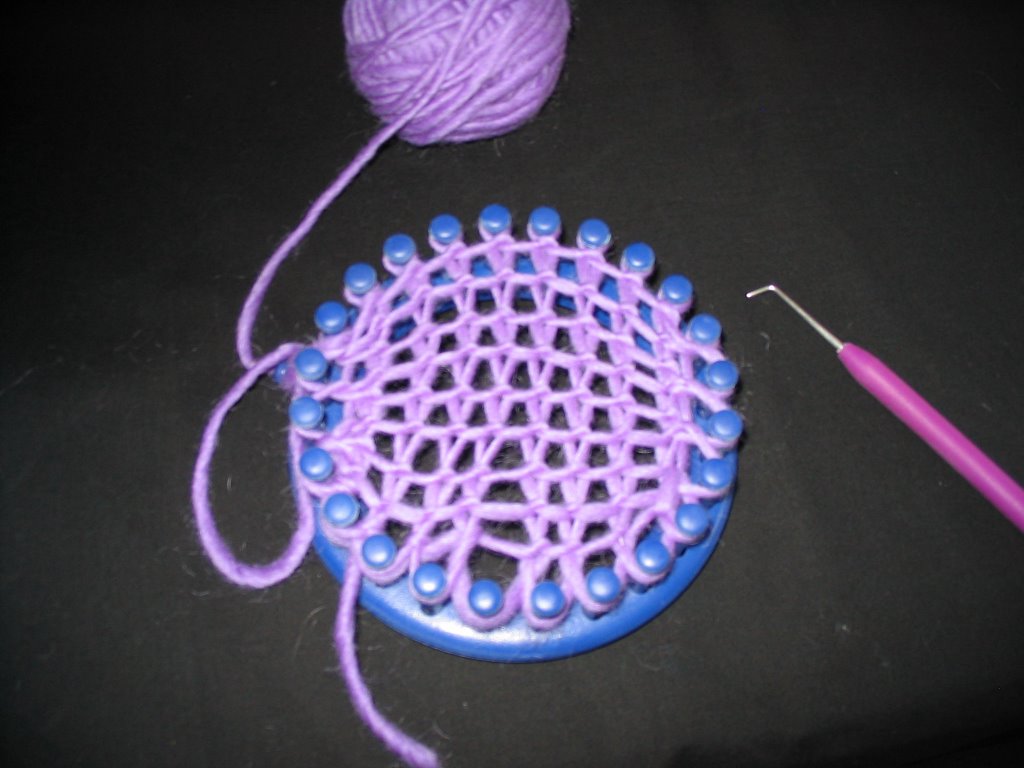 4. Now e-wrap completely around the loom and knit off. Continue knitting around the loom until the bag is as long as you would like it to be. As you knit along you will see the base of the bag develop into a more boxy shape.
5. When the bag is as long as you would like it to be, wrap the first 11 pegs and knit off. Then, bind off 12 stitches. I used the crochet method. (Remove the first loop with a crochet hook, do 1 crochet chain stitch through this loop. Then, lift the next stitch and pull it through the loop that's on the hook. Do another crochet chain and pick up another stitch, pull loop through the loop. Continue until 12 stitches are removed.)
6. The last crocheted loop is then put on the last peg on a round - this starts the purse flap. (If you start with the peg to the left of the side hook of your loom, this means you will put this loop on the peg to the right of the side hook). It should look like the right picture below.
(NOTE: The flap starts 1 stitch before the pegs that you started with at the beginning--- and ends 1 stitch after -- you had 10 stitches at the very beginning and now you are using 12 pegs)
 7. E-wrap the remaining 12 pegs and knit off. Knit 4 rows on the same 12 pegs.
8. Decrease by moving the last stich of the 4th row onto the peg next to it and wrap the 5th row. Knit off. Decrease the next row the same way. Knit 2 rows without decreasing. Decrease the next two rows as before. Knit 2 rows without decreasing. Continue in this manner until you are down to just 5 stitches.
9. Bind off with crochet method as above. With the last single stitch on the crochet hook crochet a chain (I made mine 8 single stitches) Cut the yarn about 5" long and put it through the last chain stitch to end the chain. Then, attach chain to other side of bound off top as in the picture (below right). This creates the loop for the button. Weave in the ends.

 Now it's done! YAY! Felt if you would like. Before felting and as shown in picture, the bag is about 3 1/2" wide, with a 2" base, and mine is 4 1/2" high. This bag is a good size for my palm pilot. After felting, hopefully it will be the right size for my cell phone!
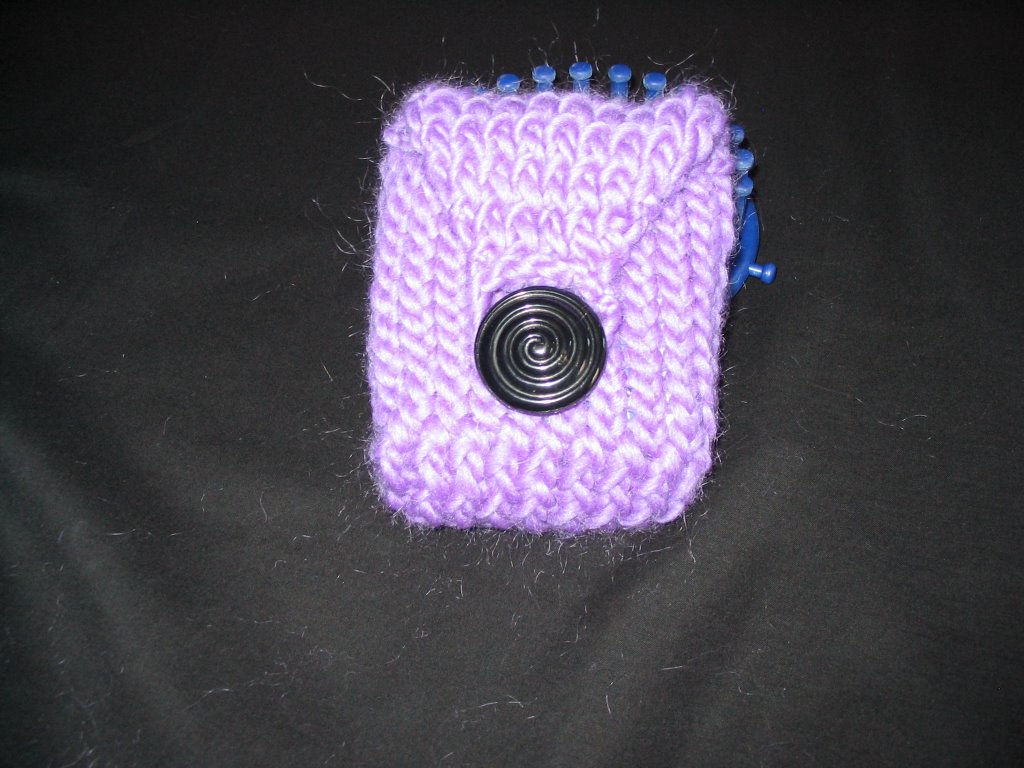
**I'm a little protective about my patterns so please don't claim it as your own. You are welcome to use it to make some for yourself and your friends... but please don't claim my words or pictures as your own!**
posted by Crystal @ 9:05 PM
![]()
![]()

13 Comments:
At 8:07 AM, SnyderCrafting said…
You're bag is terrific! I am a member of the Yahoo KK Loom group and I saw your messages, so when you posted this blog link I was very excited to see your end product. It looks very nice and I think you did a great job of explaining the instructions in your group message as well as the pics and instructions here on your blog. Thanks so much for sharing & thanks (I think) for finally getting me into the Blog world. (I had to sign up to post this message :)
Best - Jennifer
At 11:17 AM, Kathleen said…
That is very cool! Love the innovation!
At 12:13 PM, tttknits said…
That is such a super bag! I just love it! Your instructions are very clear and easy to follow, congratulations on a great project.
Blessings, Teresa
At 4:30 PM, Anonymous said…
Your bag is wonderful! I made one to hold a cell phone and my grand daughter loves it so much. Now her friends want one - and she is going to make them.
Thanks for sharing!!!
At 6:16 AM, Cynthia Knits said…
This bag is fantastic! This pattern is just what I have been looking for. I am printing it out now. I want to use the yellow loom to make a larger bag. I have one question, what is E-Wrap? That phrase threw me.
I am new to blogging and am going to put some of my pieces up on my site, Cynthia Knits. Keep up the good work with the knify knitter. I plan now to do more with my looms than just hats because of you.
At 4:56 PM, Lauren said…
Love the bag it is to cute I will have to try that one out. Thanks for putting the instructions on your blog
At 12:31 AM, Unknown said…
Wow, Thank you so much for the directions. I managed to figure it all out! I am new to Knitting, crocheting and Knifty Knitting! :) Even a newbie like me was able to figure it all out! :) Hopefully my bag turns out nice like yours (though I dont want to make it with the flap, so I am going to just finish it off some how) ...
At 12:04 PM, Anonymous said…
i just love your bag. i tried making it but mine didnt turn out as well as yours. Is blogging free?
At 10:36 AM, Jeannie said…
This bag bottom was so easy to make. I used it to make a bottle holder bag. THANK YOU for you easy instructions and photos. I am trying to figure out how to use your pattern idea on a larger loom. Have you tried it? Wish me luck!~
At 9:13 PM, Anonymous said…
Thank you for sharing your skills, creativity and ideas!
Martha
At 1:20 PM, Anonymous said…
I really like your bag. However I am new to this and going back and forth is not working for me. It seems very tight. Not sure what I am doing wrong. Any Ideas?
At 1:58 PM, Anonymous said…
I have been browsing online greater than three hours today, yet I never found any fascinating article like
yours. It is beautiful value enough for me. Personally,
if all web owners and bloggers made just right content as you probably did,
the internet will likely be a lot more useful than ever before.
Also see my web page > http://fitness-coach.org/
At 1:29 PM, Anonymous said…
Excellent article. I definitely appreciate this website. Keep it up!
My webpage ... www.seapp.ihandssocial.com
Post a Comment
<< Home